|
|
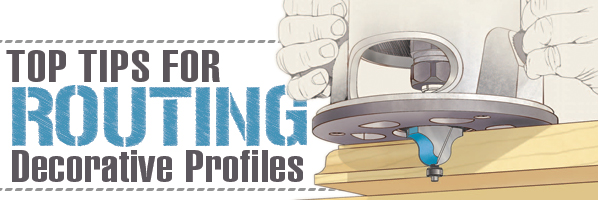
Adding a decorative edge profile is a great way to dress up a project and take it to the next level, and it’s something you can easily do using a router. Here are a few tips to make those routed profiles come out perfect every time, whether you are using your Kreg router table, or routing with a handheld router.
|
|

The first thing you need to know when routing an edge profile is which way to move the router if you are routing handheld, or which way to move the workpiece when routing on a router table. It’s important because routing in the wrong direction makes the router (or workpiece) hard to control, which can lead to a ruined workpiece or a potential injury. Thankfully, there are a couple of simple rules to make it easy.
For handheld routing, use the “rule of thumb” shown in the illustration below. Just point your right thumb at the edge you plan to rout, and then point your forefinger to show the direction the router should travel.

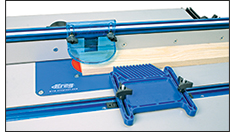
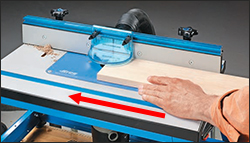 When you’re routing on a router table, the rule changes and gets simpler: You’ll almost always rout from right to left, as shown in the photo at right. When you’re routing on a router table, the rule changes and gets simpler: You’ll almost always rout from right to left, as shown in the photo at right.
|
|

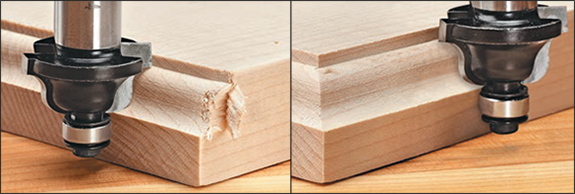
Once you know which way to rout, you need to know where to start routing. This might not seem important, but it is because when you’re routing across the end of a board, the bit tends to tear the wood fibers as it exits the wood. So, if you rout across the end first, and then continue along the edge, the bit will cut away the torn-out area, and leave you with a smooth profile. This holds true whether you’re routing handheld or on a table.
|
|

When you’re routing an edge profile, you need to keep the router bit firmly against the wood to maintain control of the cut and to ensure that the profile is consistent. With a handheld router, the weight of the router and the strength of your arms make this fairly easy.
 When you’re routing on a table, though, holding the workpiece against the bit can be more of a challenge. To help keep the workpiece in place, use a featherboard (like the Kreg True-FLEX), or even two, to help hold your workpiece against the fence and the table as you rout. You can also increase workpiece control (and keep your hands safely away from the bit) by using a push stick. When you’re routing on a table, though, holding the workpiece against the bit can be more of a challenge. To help keep the workpiece in place, use a featherboard (like the Kreg True-FLEX), or even two, to help hold your workpiece against the fence and the table as you rout. You can also increase workpiece control (and keep your hands safely away from the bit) by using a push stick.
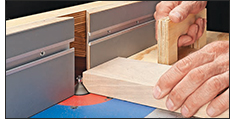 Featherboards and push sticks are great when you are routing along an edge on the router table, but they won’t help you when routing across the end of a narrow piece. If your router table is equipped with a miter slot, you can use a miter gauge to control the workpiece. Another option is to use a push block that rides against the fence. Featherboards and push sticks are great when you are routing along an edge on the router table, but they won’t help you when routing across the end of a narrow piece. If your router table is equipped with a miter slot, you can use a miter gauge to control the workpiece. Another option is to use a push block that rides against the fence.
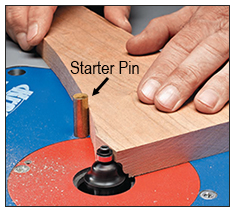 If you need to rout a profile on the edge of a curved piece, though, you won’t be able to use the router table fence. That’s where you need a router table insert plate that’s equipped with a start pin. It helps you to start your cut without the bit grabbing your workpiece. You just rest your workpiece against the pin, and then rotate the piece into the bit until the edge makes contact with the router bit bearing. If you need to rout a profile on the edge of a curved piece, though, you won’t be able to use the router table fence. That’s where you need a router table insert plate that’s equipped with a start pin. It helps you to start your cut without the bit grabbing your workpiece. You just rest your workpiece against the pin, and then rotate the piece into the bit until the edge makes contact with the router bit bearing.
|
|

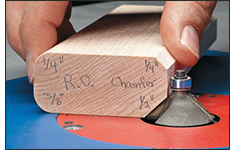 Once you’ve mastered routing edge profiles, you’re bound to want to use them again and again to dress up future projects. You can make this easier by creating a setup block. Just rout along the edge of a block while you still have your bit set up, and then mark the profile on the block. Then, the next time you want to recreate that setup, you can use the block to quickly and easily set the position of your bit. Once you’ve mastered routing edge profiles, you’re bound to want to use them again and again to dress up future projects. You can make this easier by creating a setup block. Just rout along the edge of a block while you still have your bit set up, and then mark the profile on the block. Then, the next time you want to recreate that setup, you can use the block to quickly and easily set the position of your bit.
|
|